
代码自动创建AnimatorController和动画测试环境
用所选动画一键创建Animator Controller,并且搭建好动画测试环境,添加测试动画的UI按钮。
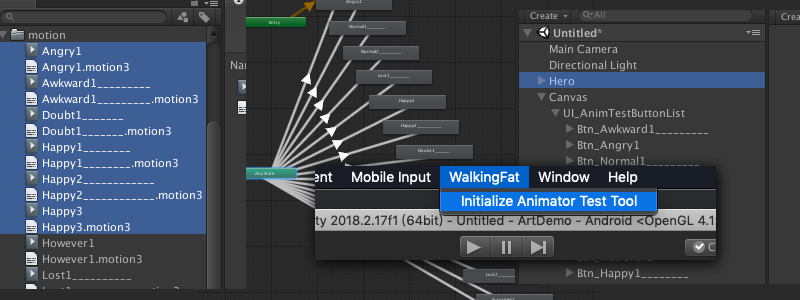
手动创建Animator挺费事的,特别是反复修改动画再倒入Unity里测试的时候。我当前参与的项目用的Live2D做纸片人动画,做的AnimatorController只是把所有的AnimationClip分别填再一个State里,然后都是创建AnyState的Transition。如下图。

规则很简单,所以很容易用代码创建。
代码如下:
using UnityEngine;
using UnityEditor;
using UnityEditor.Animations;
using System.Collections;

public class TestInitializeAC : MonoBehaviour
{
    [MenuItem(“WalkingFat/Initialize Animator Test Tool")]
    static void CreateController()
    {
        // 先创建这个animator controller
        var controller = UnityEditor.Animations.AnimatorController.CreateAnimatorControllerAtPath("Assets/StateMachineTransitions.controller");

        // 然后在layer 0 里加一个状态机
        var rootStateMachine = controller.layers[0].stateMachine;

        // 创建一个参数“statusId”,后面就通过修改这个参数改变动画
        controller.AddParameter("statusId", AnimatorControllerParameterType.Int);

        // 最后在这里通过循环语句,在当前选中的内容里筛选出animation clip创建state。
        int clipCount = 0;
        for (int i = 0; i < Selection.objects.Length; ++i)
        {
            if (Selection.objects[i].GetType().ToString() == "UnityEngine.AnimationClip") { // 判断选中的对象是不是animation clip

                // 在状态机里创建state
                var state = rootStateMachine.AddState(Selection.objects[i].name);
                // 把animation clip填入state的Motion里
                state.motion = Selection.objects[i] as Motion;

                // 创建跳转,这里就直接从anyState里跳转到各个state
                var stateMachineTransition = rootStateMachine.AddAnyStateTransition(state);
                // 设置跳转条件:当参数“statusId”等于一个id值时,这里id从0开始递增。
                stateMachineTransition.AddCondition(UnityEditor.Animations.AnimatorConditionMode.Equals, clipCount, "statusId”);
                // 把“canTransitionToSelf ”设成false,避免卡死在动画第一帧。
                stateMachineTransition.canTransitionToSelf = false;
                // 跳转过度周期设成0.2秒
                stateMachineTransition.duration = 0.2f;

                clipCount += 1; // 最后id递增
            }
        }
    }
}
这样在unity主菜单里就可以直接点按钮执行这个方法了。
现在Animator可以自动创建了,再做个运行测试工具:
- 在project窗口里选中所有animation clip,再到Hierarchy窗口里选中动画对象的GameObject,再点击顶部菜单按钮“WalkingFat > Initialize Animator Test Tool”
- 自动根据所有State创建一排按钮,并且以动画名字命名
- 点击按钮通过修改animator的参数“statusId”的方式播放对应的动画。

现在只需要把动画导入unity引擎,然后完成以上三步就可以创建好aniamtor controller和测试按钮,并且所有对象的关联都做好了,直接运行就可以看效果了。
实现这两条用了蛮多UnityEditor和EventSystem的知识。
完整代码:
using UnityEngine;
using UnityEditor;
using UnityEditor.Animations;
using System.Collections;
using UnityEngine.UI;
using UnityEngine.Events;
using UnityEditor.Events;
using UnityEngine.EventSystems;

public class WfAnimInitializeTool : MonoBehaviour
{
    [MenuItem("WalkingFat/Initialize Animator Test Tool")]
    static void CreateController()
    {
        // 首先检测一下选中的对象是否符合要求:在Hierarchy里选择1个animator对象,在Project里选择若干animation clip
        int selectedAnimClipCount = 0;
        int selectedL2dObjCount = 0;
        int l2dObjId = 0;
        for (int i = 0; i < Selection.objects.Length; ++i)
        {
            if (Selection.objects[i].GetType().ToString() == "UnityEngine.AnimationClip")
                selectedAnimClipCount += 1;

            if (Selection.objects[i].GetType().ToString() == "UnityEngine.GameObject")
            {
                selectedL2dObjCount += 1;
                l2dObjId = i;
            }
        }

        // 不符合要求报错,并且终止
        if (selectedL2dObjCount == 0)
        {
            Debug.LogError("Please select the Animator GameObject in Hierarchy.");
            return;
        }
        if (selectedL2dObjCount > 1)
        {
            Debug.LogError("Please select 1 Animator GameObject Hierarchy.");
            return;
        }
        if (selectedAnimClipCount == 0)
        {
            Debug.LogError("Please select Animation Clips in Project.");
            return;
        }

        // 检测animator对象是否带有Aniamtor component,没有就装一个
        GameObject animObj = Selection.objects[l2dObjId] as GameObject;
        Animator animInObj = animObj.GetComponent<Animator>();
        if (animInObj == null)
            animInObj = animObj.AddComponent<Animator>();

        // 在project里创建一个用来放animator controller的目录
        if (AssetDatabase.IsValidFolder("Assets/TempAnimatorController") == false)
            AssetDatabase.CreateFolder("Assets", "TempAnimatorController");

        // 创建animator controller
        var controller = UnityEditor.Animations.AnimatorController.CreateAnimatorControllerAtPath("Assets/TempAnimatorController/" + animObj.name + ".controller");

        // 在animator controller里创建状态机
        var rootStateMachine = controller.layers[0].stateMachine;

        // 创建一个参数“statusId”,后面就通过修改这个参数改变动画
        controller.AddParameter("statusId", AnimatorControllerParameterType.Int);

        // 创建canvas
        GameObject canvas = GameObject.Find("Canvas");
        GameObject btnCon;
        GameObject button;
        GameObject eventSystem = GameObject.Find("EventSystem");

        if (canvas == null)
            canvas = new GameObject("Canvas", typeof(Canvas), typeof(RectTransform), typeof(CanvasScaler), typeof(GraphicRaycaster));  //创建一个GameObject  加入Canvas的组件
        if (eventSystem == null)
            eventSystem = new GameObject("EventSystem", typeof(EventSystem), typeof(StandaloneInputModule));  //创建一个GameObject  加入Canvas的组件

        canvas.GetComponent<CanvasScaler>().referenceResolution = new Vector2(600, 800);
        canvas.GetComponent<CanvasScaler>().matchWidthOrHeight = 1f;
        canvas.GetComponent<Canvas>().renderMode = RenderMode.ScreenSpaceOverlay;

        // 检测并删除掉老的按钮
        btnCon = GameObject.Find("Canvas/UI_AnimTestButtonList");
        if (btnCon != null)
            DestroyImmediate(btnCon);

        // 创建新的UI按钮的容器
        btnCon = new GameObject("UI_AnimTestButtonList", typeof(RectTransform));
        btnCon.transform.SetParent(canvas.transform, false);
        btnCon.transform.localScale = new Vector3(1,1,1);
        btnCon.GetComponent<RectTransform>().pivot = new Vector2(0, 1);
        btnCon.GetComponent<RectTransform>().anchorMin = new Vector2(0, 0);
        btnCon.GetComponent<RectTransform>().anchorMax = new Vector2(0, 1);
        btnCon.GetComponent<RectTransform>().offsetMin = new Vector2(0, 0);
        btnCon.GetComponent<RectTransform>().offsetMax = new Vector2(300, 0);
        GridLayoutGroup glg = btnCon.AddComponent<GridLayoutGroup>();
        glg.padding.left = 10;
        glg.padding.right = 10;
        glg.padding.top = 10;
        glg.padding.bottom = 10;
        glg.cellSize = new Vector2(100,40);
        glg.spacing = new Vector2(10, 10);

        // 设置状态机的状态和跳转条件,创建测试按钮。
        int clipCount = 0;
        for (int i = 0; i < Selection.objects.Length; ++i)
        {
            if (Selection.objects[i].GetType().ToString() == "UnityEngine.AnimationClip") {

                // 创建状态并且把动画clip填进去
                var state = rootStateMachine.AddState(Selection.objects[i].name);
                state.motion = Selection.objects[i] as Motion;

                // 创建传输条件
                var stateMachineTransition = rootStateMachine.AddAnyStateTransition(state);
                stateMachineTransition.AddCondition(UnityEditor.Animations.AnimatorConditionMode.Equals, clipCount, "statusId");
                stateMachineTransition.canTransitionToSelf = false;
                stateMachineTransition.duration = 0.2f;

                // 创建测试按钮
                button = new GameObject("Btn_" + Selection.objects[i].name, typeof(RectTransform), typeof(Image), typeof(Button));  //创建一个GameObject 加入Button组件
                Button btn = button.GetComponent<Button>();
                button.transform.SetParent(btnCon.transform, false);  //把Canvas设置成Button的父物体
                button.transform.localScale = new Vector3(1, 1, 1);
                ColorBlock cb = new ColorBlock();
                cb.normalColor = new Color(1, 1, 1, 1);
                cb.highlightedColor = new Color(1, 1, 0, 1);
                cb.pressedColor = new Color(0.9f, 0.9f, 0.9f, 1);
                cb.disabledColor = new Color(0.6f, 0.6f, 0.6f, 1);
                cb.colorMultiplier = 1;
                btn.colors = cb;

                // 设置按钮文字和按钮颜色
                GameObject btnText = new GameObject("Text", typeof(RectTransform), typeof(Text));
                btnText.transform.SetParent(button.transform, false);
                btnText.transform.localScale = new Vector3(1,1,1);
                btnText.GetComponent<RectTransform>().anchorMin = new Vector2(0, 0);
                btnText.GetComponent<RectTransform>().anchorMax = new Vector2(1, 1);
                btnText.GetComponent<RectTransform>().offsetMin = new Vector2(0, 0);
                btnText.GetComponent<RectTransform>().offsetMax = new Vector2(0, 0);

                btnText.GetComponent<Text>().alignment = TextAnchor.MiddleCenter;
                btnText.GetComponent<Text>().text = Selection.objects[i].name;
                btnText.GetComponent<Text>().color = new Color(0,0,0,1);
                btnText.GetComponent<Text>().fontSize = 12;

                // 在按钮里添加Onclick事件,由于按钮事件无法传递参数,所以另写了一个绑在按钮上的类来存储状态Id和设置动画状态ID的方法。
                WfAutomaticAnimSetter btnCtrlr = button.AddComponent<WfAutomaticAnimSetter>();
                btnCtrlr.id = clipCount;
                btnCtrlr.anim = animInObj;

                UnityAction setId = System.Delegate.CreateDelegate(typeof(UnityAction), btnCtrlr, "SetAnimId") as UnityAction;
                UnityEventTools.AddPersistentListener(btn.onClick, setId);

                clipCount += 1;
            }
        }
        // 最后把创建好的Animation Controller填到动画对象的Animator里
        animInObj.runtimeAnimatorController = controller;
    }
}
另外按钮上要绑一个set动画状态的代码:
using System.Collections;
using System.Collections.Generic;
using UnityEngine;

public class WfAutomaticAnimSetter : MonoBehaviour {
    // 存储Animator引用和动画Id
    public Animator anim;
    public int id;

    // 用于按钮Onclick事件
    public void SetAnimId () {
        anim.SetInteger ("statusId", id);
    }
}


13 Responses