
Unity3D中制作CubeMap的工具

介绍将场景渲染到Cubemap,并且导出成PNG贴图的工具。
将场景渲染到CubeMap
- 首先搭建一个创景,然后创建一个cubemap,并且把camera放在合适的位置
- 把以下代码复制到一个C#文件里,并且放到根目录下的Editor文件夹里。
- 然后从顶部菜单里选择GameObject/Render into Cubemap
- 在弹出面板里填入渲染坐标(Camera坐标)和目标cubemap,点击“Render”按钮,完成!
创建Cubemap的方式有2种
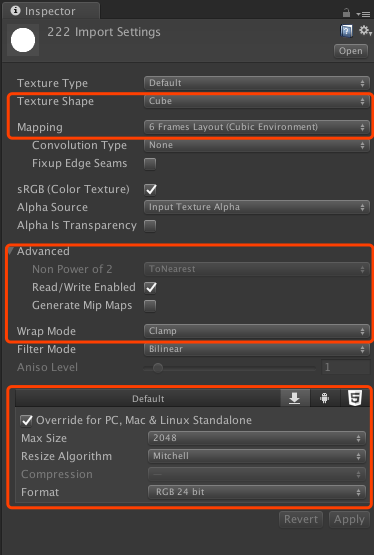
- Legacy Cubemap:直接创建就行,注意设置里Readable打勾

- 先导入任意一张贴图,设置成Cubemap,参考下图的设置。
渲染到Cubemap代码:
using UnityEngine;
using UnityEditor;
using System.Collections;

public class RenderCubemapWizard : ScriptableWizard {
    public Transform renderFromPosition;
    public Cubemap cubemap;

    void OnWizardUpdate() {
        string helpString = "Select transform to render from and cubemap to render into";
        bool isValid = (renderFromPosition != null) && (cubemap != null);
    }

    void OnWizardCreate() {
        // create temporary camera for rendering
        GameObject go = new GameObject("CubemapCamera");
        go.AddComponent<Camera>();

        // place it on the object
        go.transform.position = renderFromPosition.position;
        go.transform.rotation = Quaternion.identity;

        // render into cubemap
        go.GetComponent<Camera>().RenderToCubemap(cubemap);

        // destroy temporary camera
        DestroyImmediate(go);
    }

    [MenuItem("GameObject/Render Into Cubemap")]
    static void RenderCubemap () {
        ScriptableWizard.DisplayWizard <RenderCubemapWizard> (“Render Into  Cubemap", "Render!");
    }
}
从Cubemap导出6张贴图
有时候做法是先搭建一个白模场景渲染到cubemap贴图,让原画细化贴图,再贴回到cubemap里。
- 把以下代码复制到一个C#文件里,并且放到根目录下的Editor文件夹里。
- 然后从顶部菜单里选择GameObject/Save CubeMap To Png
- 在弹出面板里填入cubemap,点击“Save”按钮,完成!导出目录是Assets根目录。
- 注意导出的6张贴图尺寸刚好是cubemap原来尺寸的1/4.
Cubemap导出6张贴图的代码:
using UnityEngine;
using UnityEditor;
using System.Collections;

public class SaveCubemapToPngWizard : ScriptableWizard {
    public Cubemap cubemap;

    void OnWizardUpdate () {
        helpString = "Select cubemap to save to individual png";
        isValid = (cubemap != null);
    }

    void OnWizardCreate() {
        int width = cubemap.width;
        int height = cubemap.height;

        Debug.Log(Application.dataPath + "/" +cubemap.name +"_PositiveX.png");
        var tex = new Texture2D (width, height, TextureFormat.RGB24, false);
        // Read screen contents into the texture
        tex.SetPixels(cubemap.GetPixels(CubemapFace.PositiveX));
        // Encode texture into PNG
        var bytes = tex.EncodeToPNG();
        System.IO.File.WriteAllBytes(Application.dataPath + "/"  + cubemap.name +"_PositiveX.png", bytes);

        tex.SetPixels(cubemap.GetPixels(CubemapFace.NegativeX));
        bytes = tex.EncodeToPNG();
        System.IO.File.WriteAllBytes(Application.dataPath + "/"  + cubemap.name +"_NegativeX.png", bytes);

        tex.SetPixels(cubemap.GetPixels(CubemapFace.PositiveY));
        bytes = tex.EncodeToPNG();
        System.IO.File.WriteAllBytes(Application.dataPath + "/"  + cubemap.name +"_PositiveY.png", bytes);

        tex.SetPixels(cubemap.GetPixels(CubemapFace.NegativeY));
        bytes = tex.EncodeToPNG();
        System.IO.File.WriteAllBytes(Application.dataPath + "/"  + cubemap.name +"_NegativeY.png", bytes);

        tex.SetPixels(cubemap.GetPixels(CubemapFace.PositiveZ));
        bytes = tex.EncodeToPNG();
        System.IO.File.WriteAllBytes(Application.dataPath + "/"  + cubemap.name +"_PositiveZ.png", bytes);

        tex.SetPixels(cubemap.GetPixels(CubemapFace.NegativeZ));
        bytes = tex.EncodeToPNG();
        System.IO.File.WriteAllBytes(Application.dataPath + "/"  + cubemap.name +"_NegativeZ.png", bytes);


        DestroyImmediate(tex);
    }

    [MenuItem("GameObject/Save CubeMap To Png")]
    static void SaveCubeMapToPng () {
        ScriptableWizard.DisplayWizard <SaveCubemapToPngWizard> (“Save CubeMap To Png", "Save");
    }
}


13 Responses